|
At some point we are hoping to be able to offer a compact and reasonably comprehensive booklet on plunger-filler repair. For the moment, here are some very basic instructions on dealing with thin-rod American-style plunger-fillers, such as Sheaffers and Wahl-Eversharps of the 1930s and '40s. Replacement of the piston seal washer is straightforward, but note that correct diameter is critical. Too small and there will be no seal; too large, and the washer will catch on the barrel walls -- sometimes ending up torn right off the piston. In general, the perfect diameter is only slightly larger than that of the backing washer. Correct thickness is also essential for optimal functioning and durability. Piston washers can be cut from 1/32 inch (0.8 mm) thick rubber sheet, but original washers were thinner, and thinner sheet does work significantly better. Unfortunately, the optimal thickness of around .025 inch (6.5 mm) is nonstandard, and not easily found. A punch set can be bought ready-made or can be fabricated from metal tubing available at any hobby shop. A little water as a lubricant helps insure a clean cut as the punch is twisted through the sheet. Centering the hole can be a bit tricky; a centering jig can be made quite easily out of a small section of metal or plastic rod, center-drilled to accommodate the center hole punch. The original Sheaffer washers came in three inch-denominated diameters: 9/32, 21/64, and 25/64, with a center hole of 1/16 (though we prefer to cut the center hole undersize, to prevent the washer seal from being stretched over the retaining nut in use).
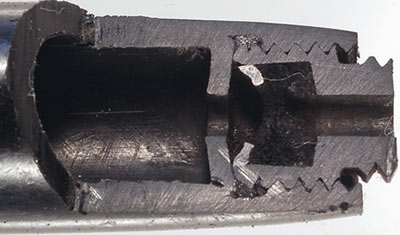
The main obstacle for plunger-filler repair has been the packing unit, which may also be called the shaft seal. The cutaway view above is of an early Sheaffer plunger-filler, where the packing unit housing screws into the back of the barrel. This construction is early and uncommon: in the great majority of pens, the housing is simply glued in place. The original packing seal has deteriorated, and originally consisted of two rubber washers (only the leftmost is visible, pulled towards the right) and felt, originally grease-soaked. The stiff closure washer is clearly visible, distorted slightly towards the left.
Pushing a thick, stiff rubber plug all the way down inside the barrel was for many years a popular stopgap, but did little to turn around the plunger-filler's reputation as difficult to fix and prone to early failure. The most popular solution to date has been to open up the original packing from the inside of the barrel, using a drill bit to pierce the original closure washer and a flat-ended scraping tool (a sharpened screwdriver will do) to clear away the remnants of rubber and felt inside. We have found that it is usually more effective to twist the drill by hand, since this allows the drill to be pressed forcefully against the closure washer which would otherwise spin and prevent the drill from catching. Turning the drill by hand also prevents overpenetration, allowing one to feel when the hard plastic closure washer is pierced. The drill bit can be held in pliers, but a better alternative is to use a tap holder, or to clamp the bit in a bench vise and turn the barrel against it. Nonetheless, sometimes the original closure washer will just spin in place, in which case a power drill is needed. In this situation, drill at high speed for short bursts with pauses in between, since friction-caused heat buildup can easily damage the end of the barrel if the job is done in one go. New packing material can then be pushed into place, again working from inside the pen barrel. One can either use alternating disks of rubber and grease-impregnated felt (the original solution) or a specially-sized rubber gasket, as shown below.
The packing chamber can then be closed off using styrene washers, which you can either make yourself from hobby shop plastic stock, or order here. A tiny bit of solvent cement will give a quick and effective bond. In our experience, acetone evaporates too quickly to provide a reliable weld; MEK (methyl ethyl ketone) is much more satisfactory, though more toxic and taking longer to cure fully. Epoxy can also be used, but in any event, it is important to protect the inside of the barrel from marring -- a plastic or metal tube will help (a large-diameter drinking straw works well), as well as the insertion tool shown below. Whichever packing method one uses, occasional application of silicone grease to the shaft will keep everything working smoothly. A few additional notes: Our original seals and closure washers were 1/4 inch in diameter, and we recommended using a 1/4 drill to open up the packing unit. This method still works and many will want to stick with it. In many cases, however, the packing compartment is slightly smaller than 1/4 inch across. For those who don't want to have to ream out the compartment with an end mill or counterbore, using a slightly smaller drill bit -- 15/64 inch or 6 mm -- is a good option, in which case our black closure washers can be used which are sized accordingly. This is especially recommended if you will be using our newer X-ring style packing seals. These more sophisticated seals are closer to rectangular than round in section, with two sealing lips on both inside and outside instead of just one. Although more efficient, they do require more care in installation. While the original round seals will work fine with extra space left inside the packing chamber (as shown above), the newer seals can bend in use if they are not held firmly in place, so it is important to make sure that the closure washer is seated all the way down, pressing against the seal. Why cement the new closure washer in place? A screw-in closure would certainly be more elegant and would make repacking simpler. But given that the original packing units typically lasted decades, and that fluorocarbon rubber seals have an estimated life several times longer than the rubber seals used in the original packing units, it will probably be a long, long time before a newly-repaired packing unit will have to be opened up again -- long enough not to justify the additional cost and complexity of a screw-in closure. Is a single solid gasket as good as the original packing of alternating rubber and felt washers? The main advantage of the more complex packing would seem to be its greater ability to retain lubricant. This would be of significant concern for a new design sold for general consumer use, but for a vintage pen being used by someone willing and able to wipe a bit of silicone grease on the shaft every now and then, the gasket is quite good enough.
A handy tool for installing the gasket can be made from a length of 1/4 inch (6.5 mm) diameter aluminum rod. Drill a hole in the end, into which you fit a piece of 1/16 inch (1.5 mm) steel rod. The exact dimensions are not critical, as long as the main rod fits into the pen's barrel and the pilot rod fits the gasket. [NOTE: this tool was sized for use with our original seals and closure washers, and with a 1/4 inch drill; for use with our new seals and closure washers, and/or for use with a 15/64 inch or 6mm drill, adjust measurements accordingly].
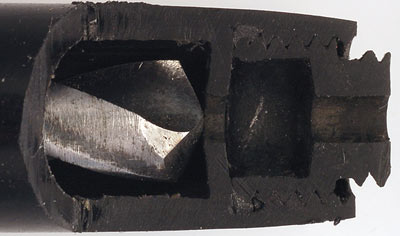
The gasket can then be mounted on the steel rod, which will act as a guide to push it into place. If you cut a short length of brass tube of 1/4 inch (6.5 mm) inside diameter and slip it over the end of the aluminum rod, the tool can then be used to install the closure washer without risk of getting the solvent glue (MEK or similar) on the inside of the barrel. The photo above shows both the gasket and the closure washer mounted on the tool at the same time, but they are best installed separately.
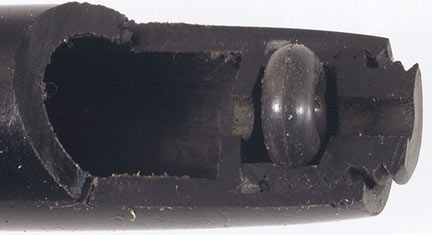
With most plunger-fillers, the barrel of the pen is also the ink reservoir. Later Sheaffer plunger-fillers, however, are built differently, with a cylindrical ink reservoir (shown above) inside of and separate from the barrel. These can be repaired without using a closure washer. The pen must be fully disassembled, including removal of the nib and feed unit from the front of the ink reservoir and removal of the plunger shaft. The packing unit can then be opened up from the back with a 7/32 inch or 6 mm drill and the packing chamber cleaned out with a pick. The rubber gasket is then pushed into place, again from the back. Because the hole is smaller than the uncompressed gasket, once the shaft is installed, the gasket cannot be pushed out of place. This same technique can be applied to other plunger-fillers, working from the front (that is, from the inside of the barrel), but it is often quite difficult to clean out the packing chamber properly -- especially when the original rubber disks have hardened. More plunger-filler info here. |